The goal of the SplendidCRM Azure Deployment system is to automate
the process of virtual machine creation, database create and application
deployment in a customer-centered production environment. Although we originally considered using
preconfigured virtual machines and prepopulated databases for performance reasons,
we found that the effort of managing the matrix of pre-created resources in all
supported regions was too much to manage.
The system we created uses clean operating systems that use
the latest build of Windows Server 2012 R2 Microsoft has published. It takes approximately 20 minutes for Azure
to spin-up a new virtual machine and a couple of minutes to create a SQL
database. As part of the deployment
process, we use PowerShell scripts to configure IIS and to deploy the
application. We expect there to be a
unique PowerShell script for each application. And, there can be multiple files as part of the deployment.
We manage the cost of the deployment using tables in the
CRM. The Azure prices are generally
stable but can change a couple of times a year. We have included current prices as of November 5, 2015, but you may need
to review them to make sure that they are accurate. You can review the current prices at the
following locations:
https://azure.microsoft.com/en-us/pricing/details/sql-database/
https://azure.microsoft.com/en-us/pricing/details/virtual-machines/
We have only included a few sample SQL prices and VM prices
in our pricing tables, but you can certainly add more.
Azure Subscription Creation
If you already have a developer account on Azure you can
start with it, but it is important that you create or use a Pay-As-You-Go
subscription instead of the Free Trial subscription. There are some resources that are not easily
migrated between subscriptions, so you will want to make sure that they are
created on the production subscription.
Microsoft has a document that describes the various accounts
and roles (https://msdn.microsoft.com/en-us/library/azure/hh531793.aspx).
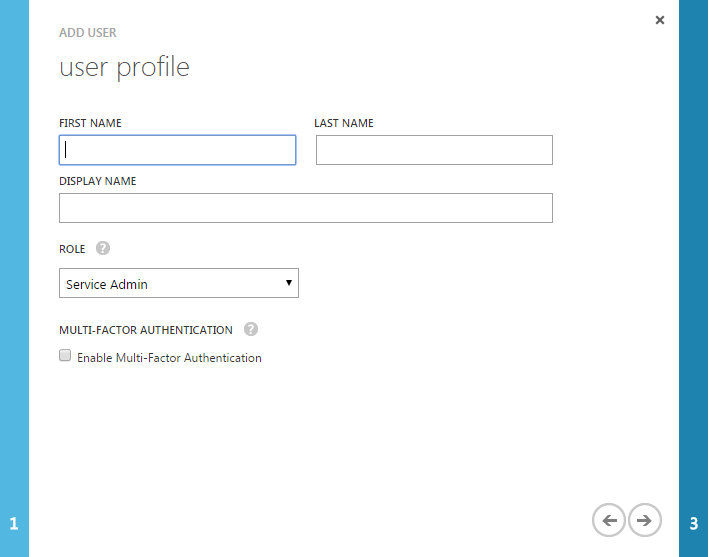
Azure Service User
SplendidCRM will need an Unattended User Account on the
Azure Active Directory. The service user
is created on the Active Directory tab of the Azure Portal on the Default
Directory. Under Users, select Add
User and specify the user name and "New
user in your organization". When you
click next, you will be asked for the Role. You must select the "Service Admin" role.
On a related note, later, you will want to change the
organizational role temporarily to a Global Admin user so that you can use a PowerShell
script to prevent the service user password from expiring. Otherwise your deployments will fail
unexpectedly when the service account password does expire. Make sure to change the role back to Service
Admin once you fix the password expiration.
Add-AzureAccount
Select-AzureSubscription -SubscriptionName
"Pay-As-You-Go"
$msolcred = Get-Credential
Connect-MsolService -credential $msolcred
Set-MsolUser -UserPrincipalName "service@xxxxxxx"
-PasswordNeverExpires $true
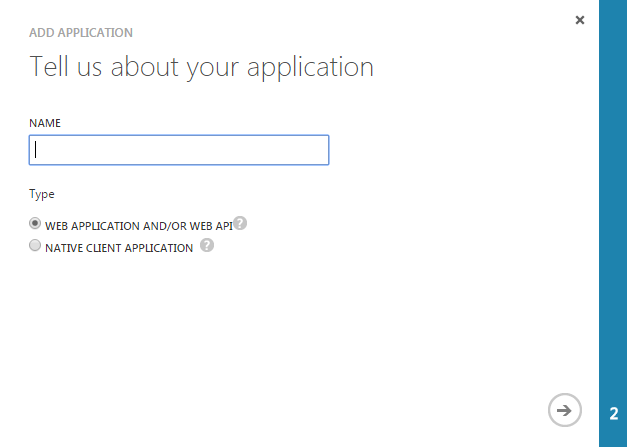
Azure App Creation
You will need to create an application under the default
active directory. Select "Add an
application my organization is developing". Make sure to specify "Native Client Application". For the Redirect URI, you can specify
"http://localhost/".
Once the app is created, you will want to copy the Client ID
as it will be needed in the CRM. The
last step is to add permissions to the new app to allow access to the
APIs. You will need to add "Windows
Azure Active Directory" and "Windows Azure Service Management".
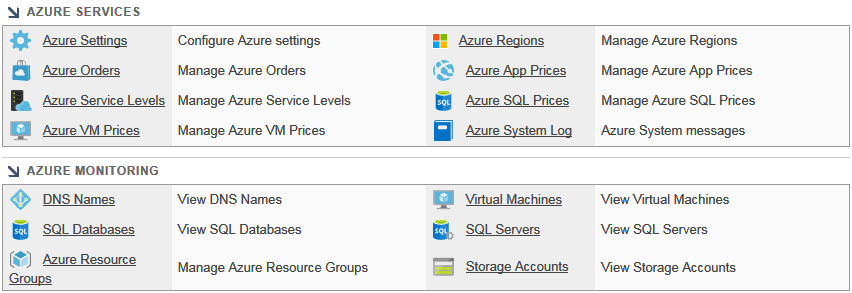
There are a couple of admin panels in the SplendidCRM admin
area that provide access to all the administrative modules.
The place to start is the Azure Settings page
where you will insert the settings from the Azure Service Account you just
created.
The CRM needs to have the security credentials in order to
create resources on the Azure stack.
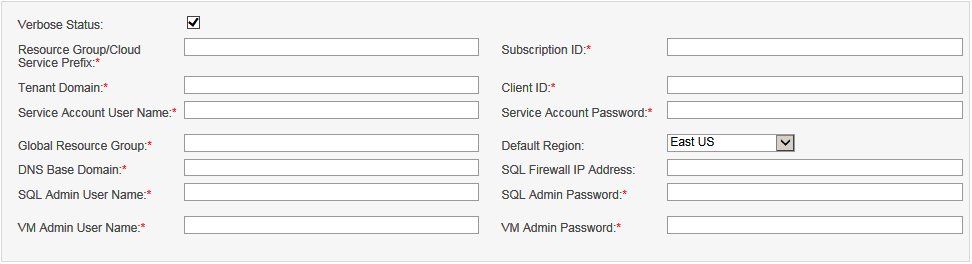
Verbose Status
This flag is used to increase the status information logged
while processing an Azure deployment.
Resource Group/Cloud Service Prefix
Some resources within Azure require a globally unique name,
across all companies. We recommend that
you use your company name with a hyphen as the prefix (i.e. Splendid-).
Although this prefix is used in the name of
the virtual machine to ensure uniqueness, the customer will not see it.
Instead, the customer will access the
services using a DNS name derived from the DNS Base Domain.
Subscription ID
The Subscription ID comes from the Azure Portal page.
You will find it on the Settings page.
Tenant Domain
The Tenant Domain comes from the Azure Portal page.
It is the Default Directory for the
subscription. You will find it on the
Settings page.
Client ID
The Client ID comes from the Azure Portal page.
It refers to the Native client application
you created earlier.
Service Account User Name
The Service Account User Name refers to the user you created
earlier.
Service Account Password
The Service Account User Password refers to the user you
created earlier.
Global Resource Group
The CRM needs a global resource group to manage DNS
entries. The resource group does not
need to be created in advance. When you
save the Azure Settings, the group will be created if it does not already exist.
Default Region
The Default Region is the region where the Global Resource
Group will reside. The default region is
typically where your DNS server will be hosted and where your global storage
account will be hosted.
DNS Base Domain
The DNS Base Domain is the root domain from which all
customer domains will be created against. You will need to use a domain that you own so that you can change the
DNS name server entries to point to the Azure DNS servers. When you save the Azure Settings page, the
base domain is created on the Azure DNS server, so you do not need to pre-create
it. One note: you can use the Azure DNS
services for all your DNS needs, but it might be easier and safer to use a
separate domain for Azure deployments.
For example, we use splendidcrm.com for our corporate needs and
splendidcrm.net for Azure deployments.
This eliminated the need to migrate splendidcrm.com entries from our old
DNS servers to the new Azure DNS servers.
If you have no legacy DNS server with critical email MX records, then it
may make sense to have just one DNS system for your company.
SQL Firewall IP Address
Azure SQL servers are protected by a firewall.
When the CRM creates a new SQL server in the
region requested by your customers, it may need to add IP address for the
SplendidCRM location so that the app can continue to manage the server.
The CRM will automatically add support for
all Azure servers to access the SQL server so that any VM create can access the
matching database.
SQL Admin User Name
When the CRM creates a new SQL server, it will need to
create an admin password for SQL server so that database can be created.
This username is different than the username
create for each database. For security
purposes, each SQL database will get a unique SQL login that has a random
component and a unique password. The
only place these values are stored are in the VM itself.
You are expected to use the SQL Admin User to
access these customer databases.
SQL Admin Password
When the CRM creates a new SQL server, it will need to
create an admin password for SQL server so that database can be created.
VM Admin User Name
All virtual machines created by the CRM will share an
administrator user name and password. You will want to make sure that the pair is both reasonably long and
complex. This is so that it is
reasonably easy to connect to the VM and perform and necessary configuration,
but also reasonably difficult for a hacker to derive.
VM Admin Password
All virtual machines created by the CRM will share an
administrator user name and password. You will want to make sure that the pair is both reasonably long and
complex.
The Azure Regions table AZURE_REGIONS is used to maintain a
list of all Microsoft Azure regions, both inactive and active.
We have prepopulated this table for your
using the known regions as of November 5th, 2015.

Name
The Name comes from the Microsoft Azure API, so you should
not change the value and any new values must match those published by
Microsoft. You can get the list of regions / locations using PowerShell (http://windowsitpro.com/azure/check-all-virtual-machine-sizes-all-azure-locations).
$azurelocations = Get-AzureLocation;
foreach ( $location in $azurelocations )
{
Write-Output
$location.Name;
}
Status
A disabled region will prevent customers from deploying to
that region.
City
The city is editable and can be changed to anything you
want. It is only expected to be used on
the customer selection screen.
The Azure Price Names table AZURE_PRICE_NAMES is used to
provide a dynamic list of available services. It includes the collection of VM services and the collection of SQL
services that will be supported. The
collections we support are much smaller than all the services Microsoft
supports simply because we expect that the customer does not need that many
choices.
Related to these lists is the Azure Service Levels table
where we match VM services to their appropriate SQL services to even further
simplify the choices the customer is presented.

Name
The name is used in the Microsoft Azure API, so the name
must match the values specified by Microsoft. You can get the list of VM names
using PowerShell (http://windowsitpro.com/azure/check-all-virtual-machine-sizes-all-azure-locations).
$location = Get-AzureLocation | Where {$_.Name -like 'East
US' }
foreach ( $size in $location.VirtualMachineRoleSizes )
{
Write-Output
$size;
}
Accepted VM names are: Basic_A0, Basic_A1, Basic_A2,
Basic_A3, Basic_A4, Standard_D1, Standard_D2, Standard_D3, Standard_D4, etc.
You can get a list of SQL service levels using PowerShell (https://msdn.microsoft.com/en-us/library/dn546721.aspx).
$objectives = Get-AzureSqlDatabaseServiceObjective
-ServerName 'xxxxxxxxxxx';
foreach ( $objective in $objectives )
{
if (
$objective.IsSystem -eq $false )
{
Write-Output
$objective.Name;
}
}
Accepted SQL names are: Basic, S0, S1, S2, S3, P1, P2, P3,
P4, etc.
Type
The type can be VM or SQL.
List Order
This is the display order.
The Azure SQL Prices table AZURE_SQL PRICES will need to
include an entry for each available SQL service at each supported region.
We have prepopulated this list for known
regions, but you may need to add more if you have added more SQL services.
You will want to make sure that the Cost
Price is correct as this is what Microsoft is going to charge you.
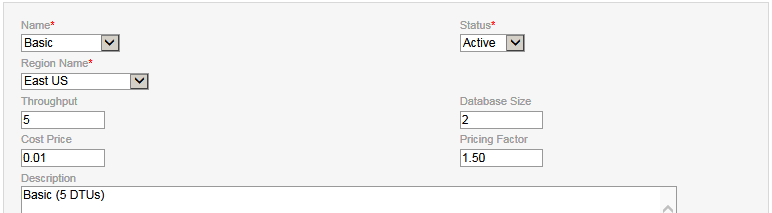
Name
This is the name of the SQL database service level as
defined in the Microsoft Azure API. This
listbox is populated from the Azure Price Names table for records of type SQL.
Status
A price can be active or inactive.
This flag is not typically seen by the
customer and is primarily informational.
Region Name
The region is important as SQL prices vary by region.
This list is populated from the Azure Regions
table.
Throughput
This is the throughput of the database for this service
level. It is primarily a display value
because the Name determines the service value. This price is not expected to
change very often, but you will want to make sure that it is up-to-date.
Database Size
This is the maximum size of the database in GB.
This is primarily a display value as the SQL
service will determine the maximum size. As SQL services are not billed based on the size of the database, there
is little reason to use any value less than the maximum.
Cost Price
The cost comes from Microsoft’s pricing tables and is in USD.
https://azure.microsoft.com/en-us/pricing/details/sql-database/.
You will want to make sure to update this
value as Microsoft publishes updates to their pricing tables.
Pricing Factor
The pricing factor is multiplied by the Cost Price to
determine the price for the customer. You have the option here of not marking-up the Microsoft fees by
specifying a value of 1.0, or you can decrease or increase the price the
customer sees by decreasing or increasing this value.
Description
This is the description displayed to the customer.
It is not translated into a localized
language for the customer, so you will have to handle that detail at the web
site level.
The Azure VM Prices table AZURE_VM_PRICES will need to
include an entry for each available VM service at each supported region.
We have prepopulated this list for known
regions, but you may need to add more if you have added more VM services.
You will want to make sure that the Cost
Price is correct as this is what Microsoft is going to charge you.
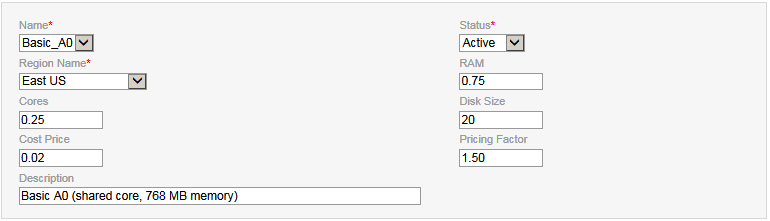
Name
This is the name of the virtual machine service level as
defined in the Microsoft Azure API. This
listbox is populated from the Azure Price Names table for records of type VM.
Status
A price can be active or inactive.
This flag is not typically seen by the
customer and is primarily informational.
Region Name
The region is important as VM prices vary by region.
This list is populated from the Azure Regions
table.
RAM
This is the amount of RAM in GB for is service value.
It is primarily a display value because the
Name determines the service level.
Cores
This is the number of processor cores for is service value.
It is primarily a display value because the
Name determines the service level.
Disk Size
This is the disk size in GB for is service value.
It is primarily a display value because the
Name determines the service level.
Cost Price
The cost comes from Microsoft’s pricing tables and is in
USD. https://azure.microsoft.com/en-us/pricing/details/virtual-machines/.
You will want to make sure to update this
value as Microsoft publishes updates to their pricing tables.
Pricing Factor
The pricing factor is multiplied by the Cost Price to
determine the price for the customer. You have the option here of not marking-up the Microsoft fees by
specifying a value of 1.0, or you can decrease or increase the price the
customer sees by decreasing or increasing this value.
Description
This is the description displayed to the customer.
It is not translated into a localized
language for the customer, so you will have to handle that detail at the web
site level.
The Azure Service Levels table AZURE_SERVICE_LEVELS is used
so simplify the selection process for the customer by combining a specific VM
service for a specific SQL service. Although the matrix of all VM services against all SQL services can be
large, we believe that the customer will want a simply and small list of
choices with logical combinations. For
example, it makes little sense to combine a very slow VM service with a super-fast
SQL service, and vice versa.
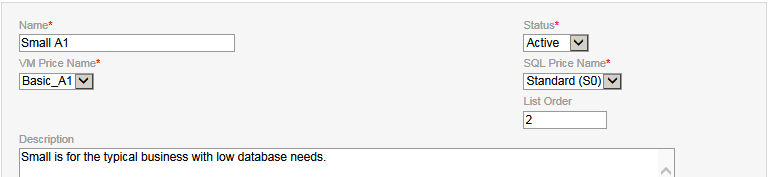
Name
This is the name of the service level displayed to the
customer. The name may need to be
localized at the web site level.
Status
Only active service levels are displayed to the customer.
VM Price Name
The VM price for the service level.
SQL Price Name
The SQL price for the service level.
List Order
This list order is the order used to display the service
levels to the customer.
Description
This is the description displayed to the customer.
It is not translated into a localized
language for the customer, so you will have to handle that detail at the web
site level.
The Azure App Prices table AZURE_APP_PRICES contains all the
information needed to deploy an application.
It is also important to note that we do not use the standard SplendidCRM
PRODUCT_TEMPLATES table for app pricing.
When orders and invoices are created by the deployment system, it is
this Azure App Prices table that is used as the template for those records.
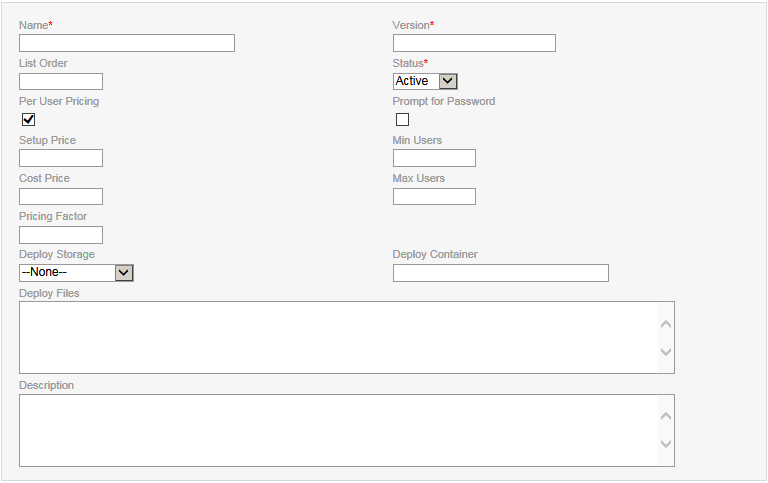
Name
This is the name of the application.
Version
This is the version of the application.
List Order
This is the order that the apps are displayed to the
customer.
Status
Only active apps are displayed to the customer.
Per User Pricing
This flag is enabled if the app is priced per user.
If so, then the user is expected to be prompted
for user quantities at the web site level.
Prompt for Password
This field is not used at this time but is intended to allow
the customer to provide an admin password for the application in advance.
Min Users
This is the minimum number of users when priced per user.
Max Users
This is the maximum number of users when priced per user.
Setup Price
If there is an initial charge to setup the app, then set a
value here. It can be zero if there is
no setup fee. When there is a setup fee,
the customer will be invoiced separately for the fee.
Cost Price
This is the cost of the application per month.
It can be zero for open-source applications.
Pricing Factor
The pricing factor is multiplied by the cost price before
displaying to the customer. The pricing
factor only applies to the Cost Price and not the Setup Price.
Deploy Storage
The Azure storage that will contain the files being
deployed.
Deploy Container
The container used in the storage.
Only one container is used per application,
so you will need to upload the shared PowerShell script files to all
containers. We recommend one container
per application to simplify management.
Deploy Files
A comma-separated list of files used in the deployment.
The first file should be a PowerShell file
that performs the customization of the OS and the deploying of the application.
Description
This is the description displayed to the customer.
It is not translated into a localized
language for the customer, so you will have to handle that detail at the web
site level.
The Azure Orders table AZURE_ORDERS is the heart of the
deployment system. Key fields in the
table are Service Name, Application, Region and Service Level.
The remaining fields are informational or are
used for management of the deployment.
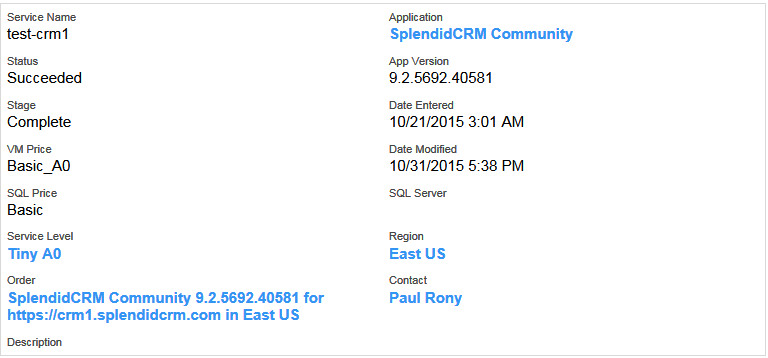
Service Name
The service name should be a valid DNS name.
The name can only contain letters, numbers
and the hyphen. The name must start with
a letter. The name must be at least 3
characters and it cannot be more than 15 characters.
Some of these restrictions are because the
name must follow Microsoft Azure Virtual Machine naming as well as DNS
names. The Fully Qualified Doman Name is
built by combining this service name value with the DNS Domain Base, with a dot
separator.
Application
The Application is a required field that points to the Azure
App Price table.
App Version
The App Version field is information and is derived from the
Application.
Status
The initial value of Status should be "Pending Processing"
to begin the deployment process. Other
status values include Pending Delete, Processing, Failed, Succeeded and
Cancelled.
Stage
The Azure Order will go through various stages as part of
the deployment, starting with validation, to creation, to deployment.
The list includes all the stages, as well
deletion/recovery stages. If an error is
encountered during the creation stages, the system will reverse the successful
creation steps until the system is back to the original state.
- Validate Service Name
- Validate DNS Name
- Validate SQL Server
- Validate Database Name
- Create Database
- Create Virtual Machine
- Get Public IP Address
- Create DNS Entry
- Provisioning Virtual Machine
- Installing Web Service
- Complete
- Delete Virtual Machine
- Delete Database
- Delete DNS Entry
Region
The Region is the Microsoft Azure location where the virtual
machine and the database will be created.
Service Level
The Service Level is a required field that points to the
Azure Service Level table.
VM Price
The VM Price is determined from the specified Service Level.
SQL Price
The SQL Price is determined from the specified Service
Level.
SQL Server
As part of the database creation step, a SQL Server is
selected or created in the same region as the virtual machine.
We store the server name so that the database
can be deleted if necessary.
Order
The Order field points to the standard CRM Orders table.
Contact
The Contact field is determined using the Order Field.
It points to the Billing Contact in the CRM Order.
Description
The description field is used to store the error from the
last step.
It is not our intent to fully replace the Azure Portal for
creation of resources, but we do provide some management for convenience.
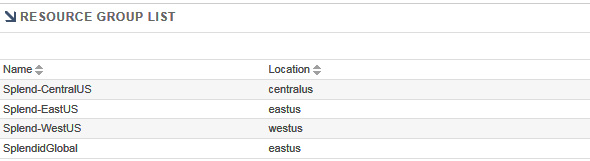
The deployment system will create a resource group in each
region. To ensure uniqueness, we will
pre-pend the resource group with the Cloud Prefix.
However, we also allow you to manually create
a resource group without the Cloud Prefix.

Name
This is the name of the resource group.
Location
The region / location of the resource group.
The CRM will automatically create a new
resource group for each region, using the Cloud Prefix and the region in the
name.
You can see a list of all resource groups that exist.
Resource groups cannot be deleted on the CRM
side as this is a very destructive operation that would include deleting all contained
virtual machines and databases.
The creation of DNS names is a critical part of the
deployment system as it allows customers to have a simple and single domain name
to access the site. As the Microsoft
Azure Portal does not provide a way to manage DNS names, we have provided the
ability to create and delete entries.

We generally do not recommend that you manually create
entries, but there are certainly times when it makes sense.

Record Type
The type of the record.
The only types that can be created are A, AAAA, CNAME and MX.
The Azure DNS System will automatically
create SOA and NS records.
The deployment system will create CNAME records to the
cloudapp.azure.com domains that the Microsoft Azure system creates for each
virtual machine. By using a CNAME
instead of the IP address of the VM will allow for more flexibility with regard
to VM reallocations.
Name
The name of the record.
Value
The value of the record.
Priority
The priority is used for MX records.
We do provide management of the storage accounts as you will
be uploading files to Microsoft Azure to the deployment storage account.
The deployment system will create new storage
accounts for each region as necessary.

We have provided a relatively simple implementation that
allows the listing of storage accounts and the uploading of files to a
specified container within a storage account.
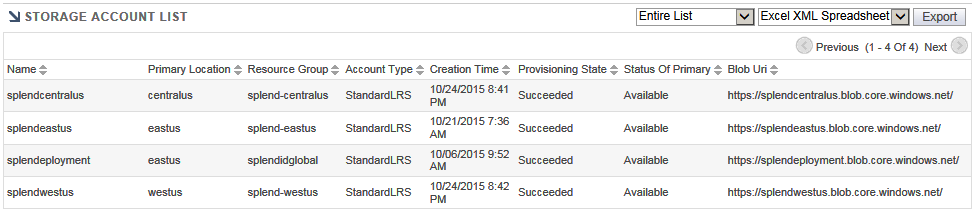
Name
The name of the storage account.
Resource Group
The resource group that the storage account applies to.
Location
The region / location of the storage account.
Uploading a File
When you upload a file, the container will be created if it
does not already exist.

We provide a way to list the existing Virtual Machines, but
we do not provide any management of them.
The list is purely informational.

We provide a way to list the existing SQL Servers, but we do
not provide any management of them. The
list is purely informational.

We provide a way to list the existing SQL Databases, but we
do not provide any management of them.
The list is purely informational.

The script to install IIS is very simple as there is a
cmdlet that does it all. We make sure to
install ASP.NET 4.5 and HTTP Activation.
We provide the sample script (IIS_Install.ps1) for this purpose.
Import-Module ServerManager
Add-WindowsFeature
Web-Server,Web-WebServer,Web-Common-Http,Web-Static-Content,Web-Default-Doc,Web-Http-Errors,Web-Http-Redirect,Web-App-Dev,Web-ISAPI-Ext,Web-ISAPI-Filter,Web-Http-Logging,Web-Log-Libraries,Web-Request-Monitor,Web-Http-Tracing,Web-Security,Web-Basic-Auth,Web-Mgmt-Tools,Web-Mgmt-Console,Web-Scripting-Tools,Web-Metabase,Web-Asp-Net45,Web-Net-Ext45,Web-WebSockets,NET-WCF-HTTP-Activation45
An optional step is to install an SSL certificate.
We have provided a sample script (PFX_Install.ps1)
that you will need to customize based on your environment.
You will need to replace {SplendidCRM.SSL.Certificate.Name}
with the actual name of your certificate file and {SplendidCRM.SSL.Certificate.Password}
with the actual password for the PFX file.
As much as we dislike including a password in a text file, we do not
know of any other way to install the certificate.
As a side note, we do typically delete the
PFX_Install.ps1 file after deployment as a simple technique to hide the
password.
$certLocalPath = '.\{SplendidCRM.SSL.Certificate.Name}.pfx'
$https = (Get-WebBinding
'Default Web Site' | where {$_.protocol -eq 'https'})
if (
$https -eq $null -and (Test-Path $certLocalPath)
)
{
Write-Output 'Adding HTTPS'
New-WebBinding
-Name 'Default Web Site' -IP '*' -Port 443 -Protocol https
#
http://www.powershellmagazine.com/2014/03/31/powershell-remoting-with-azure-windows-vms/
$X509Object = New-Object
System.Security.Cryptography.X509Certificates.X509Certificate2
$X509Object.Import($certLocalPath, '{SplendidCRM.SSL.Certificate.Password}',
'PersistKeySet')
$X509Store
= New-Object
System.Security.Cryptography.X509Certificates.X509Store 'My', 'LocalMachine'
$X509Store.Open([System.Security.Cryptography.X509Certificates.OpenFlags]::ReadWrite)
$X509Store.Add($X509Object)
$X509Store.Close()
New-Item 'IIS:\SslBindings\*!443' -Thumbprint $X509Object.Thumbprint
Remove-Item $certLocalPath
Remove-Item '.\PFX_Install.ps1'
}
We have also included an environment setup script (Environment_Setup.ps1)
that sets a bunch of Windows settings to make management of the virtual machine
easier. The script is completely
optional but does the following:
- Disable IE Enhanced Security
- Disable User Control Management
- Set IE default page
- Disable IE first run customize
- Do Not Show Server Manager
- Explorer settings
- Taskbar
- Command Prompt
- Show Desktop Icons
We are not including the file in this document because it is
not informational.
As part of a SplendidCRM deployment, the application
installation needs to install IIS, unzip the application files, configure IIS to point to the application files, apply the
SSL certificate and initialize the database.
As part of the execution of the deployment script, the first parameter
will be the connection to the database.
For this reason, the first line of the script should reference the
connection string parameter.
param($ConnectionString)
# 07/21/2015
Paul. We need to make sure that
the current location is set so that relative files are accessible.
Set-Location $PSScriptRoot
.\Environment_Setup.ps1
.\IIS_Install.ps1
#Unique
variables for each product
$company = 'SplendidCRM'
$product = 'SplendidCRM'
$zip_file
= '.\SplendidCRM_9.2.5692.40581_Community_WebGallery.zip'
#Invarients
$CRLF = "`r`n";
$root_dest = ('C:\' +
$company)
$site_dest = ($root_dest +
'\' + $product)
$webConfig = ($site_dest +
'\' + 'web.config')
$app_offline
= ($site_dest + '\' + 'app_offline.htm')
$build_sql = ($root_dest + '\Build.sql')
$build_log = ($root_dest +
'\Build.log')
if (
!(Test-Path $root_dest) )
{
Write-Output ('Creating ' + $root_dest)
New-Item $root_dest
-ItemType Directory | Out-Null
}
Copy-Item .\Environment_Setup.ps1
$root_dest
Add-Type -assembly 'System.IO.Compression.FileSystem'
[System.IO.Compression.ZipFile]::ExtractToDirectory($zip_file, $root_dest)
# Update
Web.config with connection string.
Set-ItemProperty
$webConfig -name IsReadOnly
-value $false
$xml = (Get-Content $webConfig) -as [Xml]
$SplendidSQLServer
= $xml.configuration.appSettings.add | where {$_.key
-eq 'SplendidSQLServer'}
$SplendidSQLServer.value
= $ConnectionString
$xml.Save($webConfig)
Import-Module WebAdministration
Set-ItemProperty
'IIS:\Sites\Default Web Site' -Name physicalPath -Value $site_dest
Set-ItemProperty
'IIS:\AppPools\DefaultAppPool' -Name processModel.idleTimeout -Value ([TimeSpan]::FromMinutes(0))
Set-ItemProperty
'IIS:\AppPools\DefaultAppPool' -Name recycling.periodicrestart.time
-Value ([TimeSpan]::FromMinutes(0))
.\PFX_Install.ps1
One trick that we do as part of the deployment is to create
an app_offline.htm at the root of the application web site while we populate
the database. This special file will be
presented to anyone that visits the site while it is still being built.
SplendidCRM database initialization can take
20 minutes, so the use of a progress page is important to the customer.
The following script is unique to SplendidCRM.
It is used to create the CRM objects in an
empty database.
$errors = 0
$log_text
= ''
Set-Content -Path $build_log -Value $log_text -Force
$con = New-Object System.Data.SqlClient.SqlConnection
$con.ConnectionString
= $ConnectionString
$con.open()
for ( $i = 0; $i -lt
$Commands.Length; $i++ )
{
$command = $Commands[$i].Trim()
if ( $command.Length -gt 0 )
{
$progress = [math]::Round((100
* $i)/$Commands.Length)
try
{
$offline = [String]::Format($html, $progress, $progress, $log_text,
$command)
try
{
Set-Content -Path $app_offline -Value $offline -Force
}
catch
[Exception]
{
# We do not
care if there was a problem writing to the offline file.
}
$cmd = $con.CreateCommand()
$cmd.CommandTimeout
= 0
$cmd.CommandText
= $command
$cmd.ExecuteNonQuery() |
Out-Null
}
#
http://www.leaseweblabs.com/2014/01/print-full-exception-powershell-trycatch-block-using-format-list/
catch
[Exception]
{
$errors = $errors + 1
$this_error
= ($i.tostring() + ': ' + $_.Exception.Message +
$CRLF)
$log_text
+= $this_error
#
https://technet.microsoft.com/en-us/library/Ee156791.aspx
Add-Content $build_log
($this_error + $command + $CRLF + $CRLF)
# 10/24/2015
Paul. The connection can randomly
fail. Attempt to recover.
if (
$errors -lt 100 -and ($_.Exception.Message.Contains("A
transport-level error has occurred") -or $_.Exception.Message.Contains("The
connection's current state is closed.")) )
{
$i--;
$con = New-Object System.Data.SqlClient.SqlConnection
$con.ConnectionString
= $ConnectionString
$con.open()
}
}
}
}
$con.close()
Once the database has been initialized, we delete the
offline file so that the site will function normally.
If there is a problem during deployment, we
leave the offline file in place and it will need to be removed manually (i.e. a
support specialist will need to use RDP to connect to the virtual machine to
remove the file and fix the problem.)
if (
$errors -gt 0 )
{
$log_text =
Get-Content -Path $build_log -Raw
$offline = [String]::Format($html,
$log_text)
Set-Content -Path $app_offline
-Value $offline -Force
}
else
{
Remove-Item $app_offline
}
The SplendidCRM Application Platform is constantly being
improved. Please visit the SplendidCRM
Software website to obtain the most recent version of the software:
http://www.splendidcrm.com
If you have any questions, please post them to the
SplendidCRM Support forum:
http://www.splendidcrm.com/Forums/tabid/66/Default.aspx
If you discover any errors or omissions in this document,
please email support@splendidcrm.com.